Play with Cloud Formation
CloudFormation is a service provided by AWS to help users easily build, set up, and provision resources on AWS quickly, reducing the effort required for management. Using CloudFormation brings benefits such as:
- Using it as an Infrastructure as Code (IaC) tool, where all AWS resources are managed through templates, making automation straightforward.
- Facilitating the rapid provisioning of resources in an environment, which is inherently faster than manual human operations. Additionally, in case of a need for recovery, automation reduces the system’s Recovery Time Objective (RTO). Just imagine uploading the template, clicking a few buttons, and it’s done.
- Minimizing human errors because everything is automated.
- Serving as documentation and can be used with management tools like source control to make system management on AWS more straightforward.
Using CloudFormation on the AWS console
From the AWS console, go to Service, select CloudFormation, then click on Create Stack, and choose With new resources.
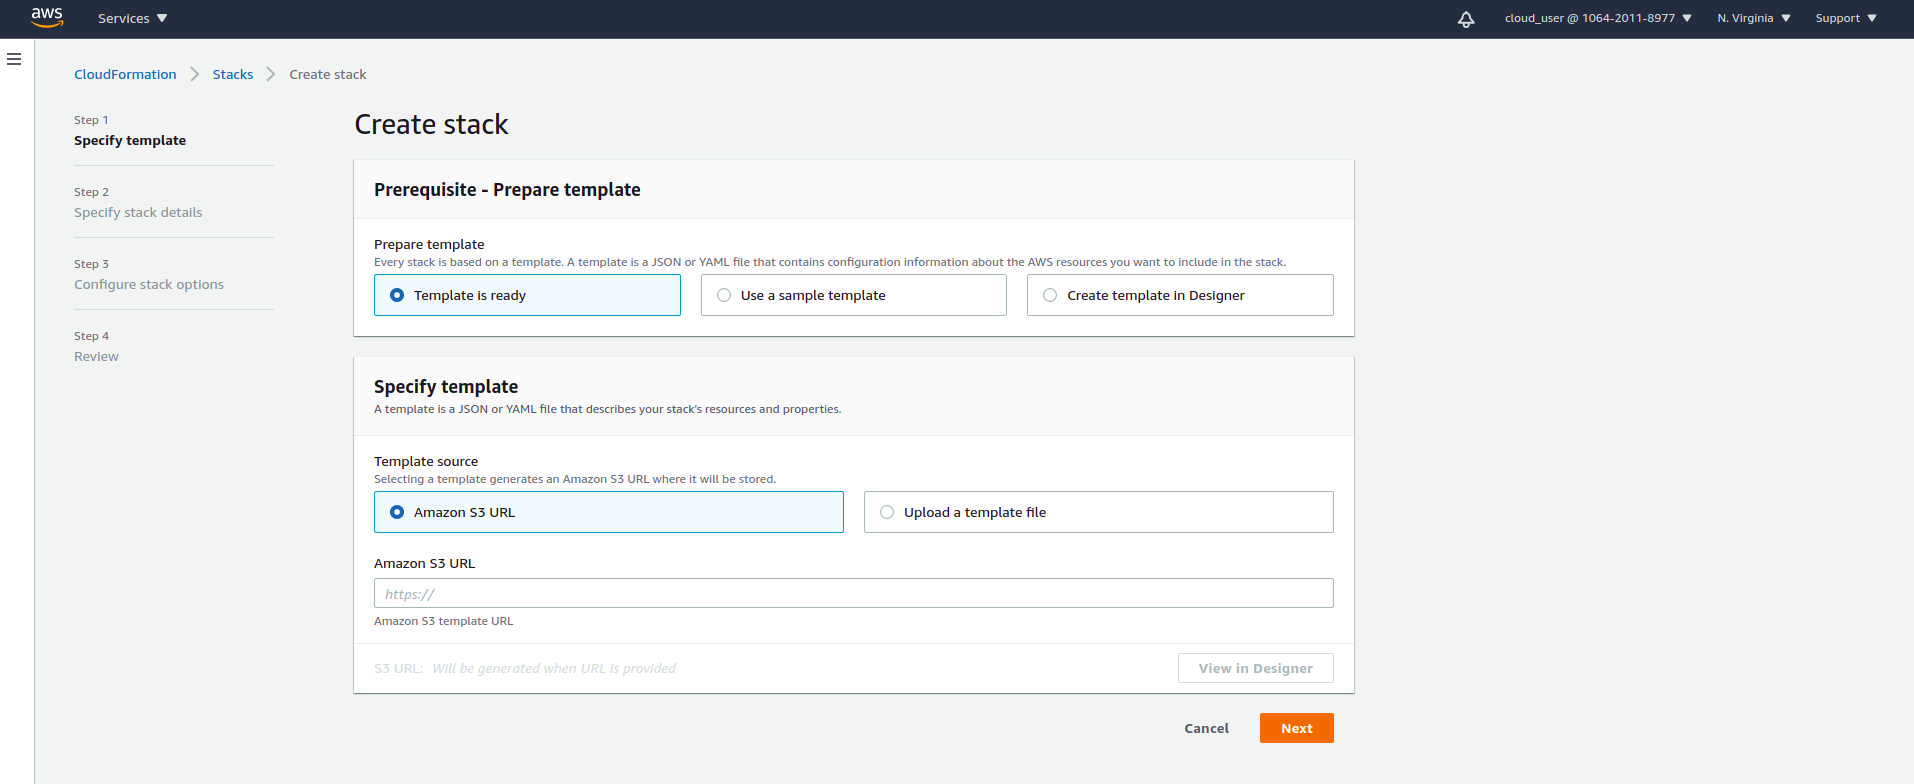
Here, there are three options for creation:
- Template is ready: Use when you already have a template ready. You can either upload a file directly from your local machine or provide the URL of a file saved on S3.
- Use a sample template: Use a template provided by AWS.
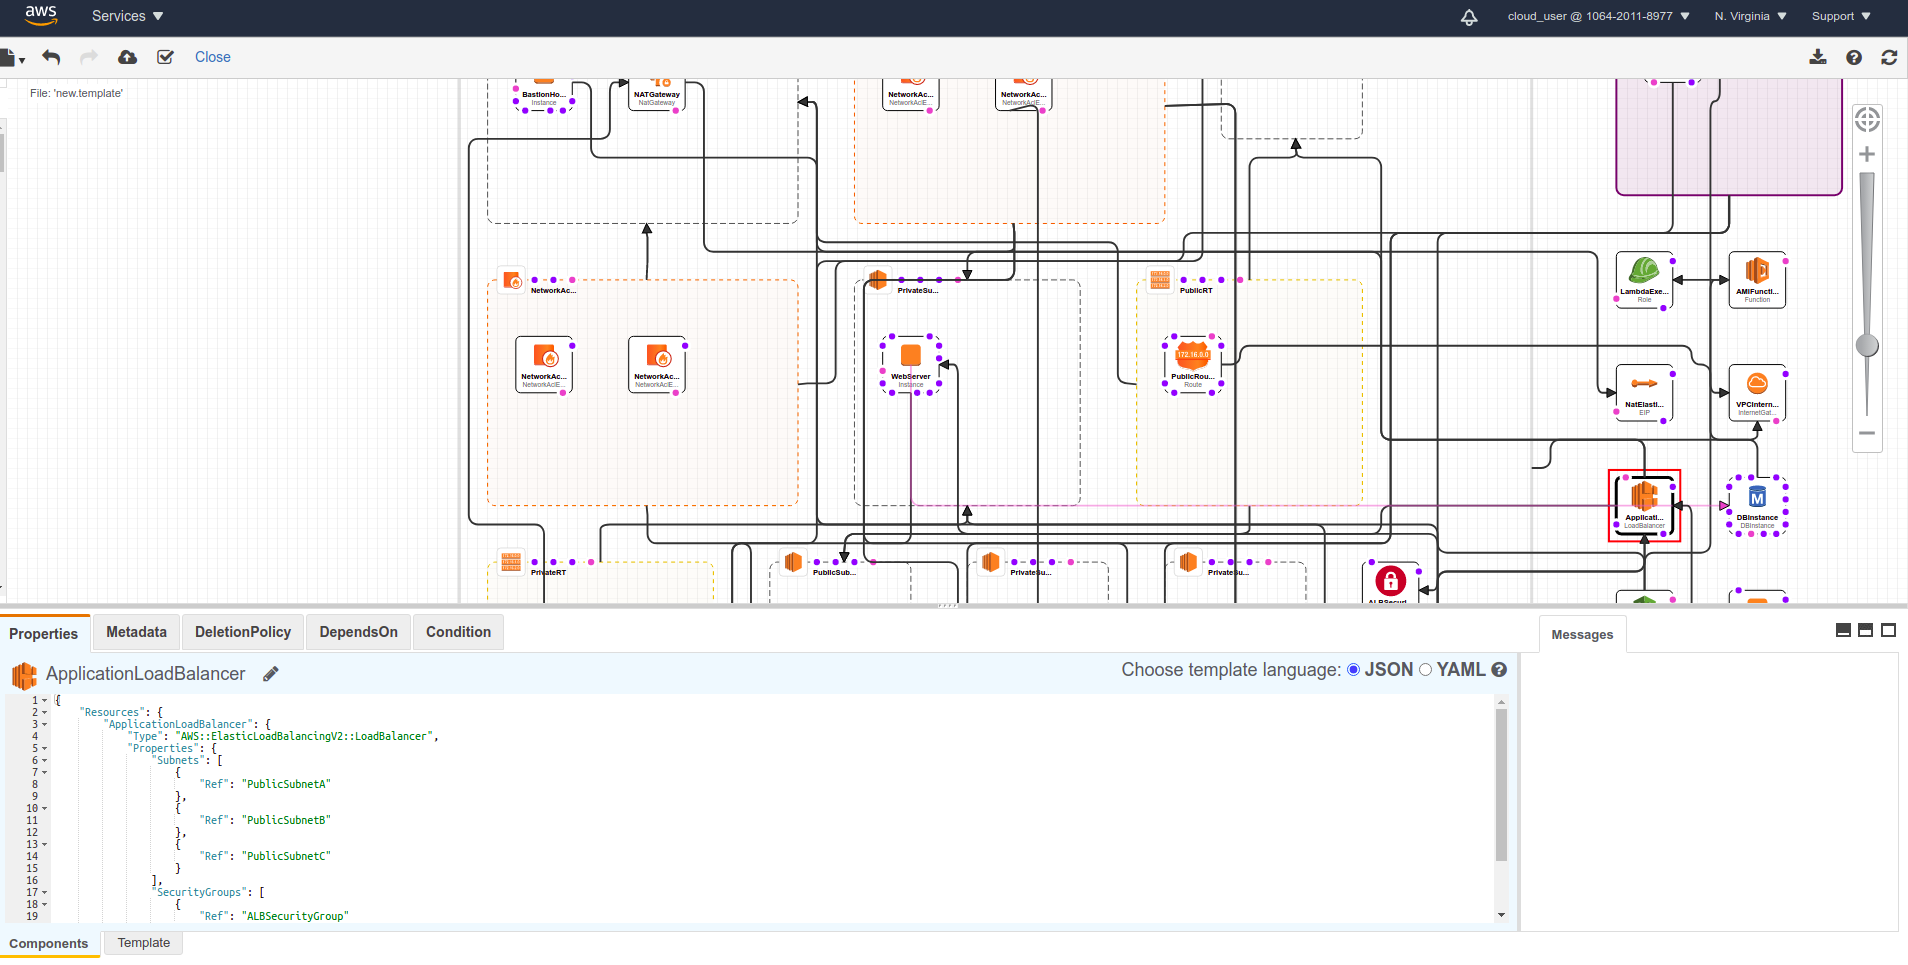
- Create template in Designer: This is a useful tool for building templates. It allows you to visually examine the current system, validate templates, and convert between YAML and JSON template formats.
Template Components
A CloudFormation template can be written in two formats: JSON and YAML. Compared to JSON, YAML is more concise and also supports comments. A complete CloudFormation template will include the following components:
AWSTemplateFormatVersion:
Description:
Parameters:
Mappings:
Resources:
Outputs:
- AWSTemplateFormatVersion: Specifies the version for the template. If this component is not specified in the template, CloudFormation will automatically use the latest version. Currently, the latest version is ‘2010-09-09’, which is also the only valid value.
- Description: Allows you to add comments to explain the template.
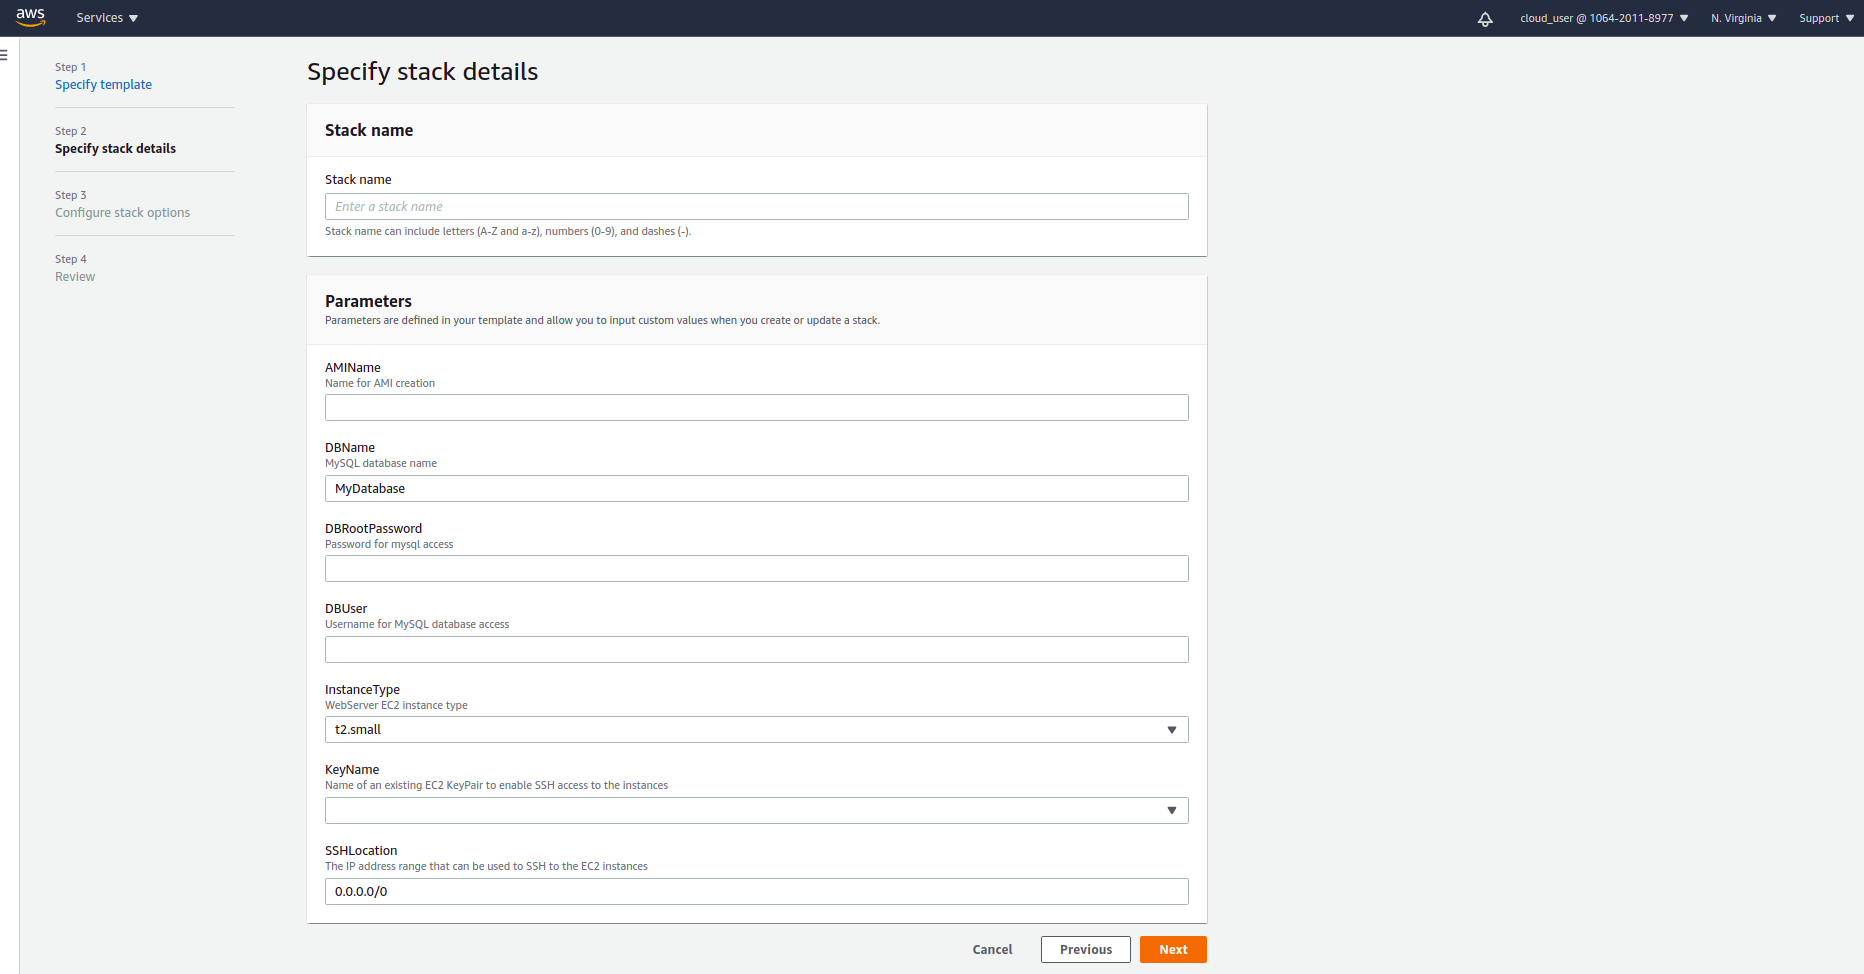
- Parameters: Allows you to pass custom parameters when creating the template. When creating it through the console, there will be a step to select these parameters.
- Mappings: Used to create a key-value mapping, which is used to retrieve corresponding values for specified keys when needed by using the intrinsic function
Fn::FindInMap - Resources: This is a mandatory component of the template. Without it, the stack cannot be created. This section is used to declare the resources on the stack that need to be initialized.
- Outputs: This section is used to declare values needed after the stack has been created. The values will be displayed in the Outputs section on the UI console. For example, when creating a load balancer after the resources are created, you may want to retrieve the DNS name of that load balancer for testing.
Creating a stack with CloudFormation
The template you plan to create in Designer may look like the following:
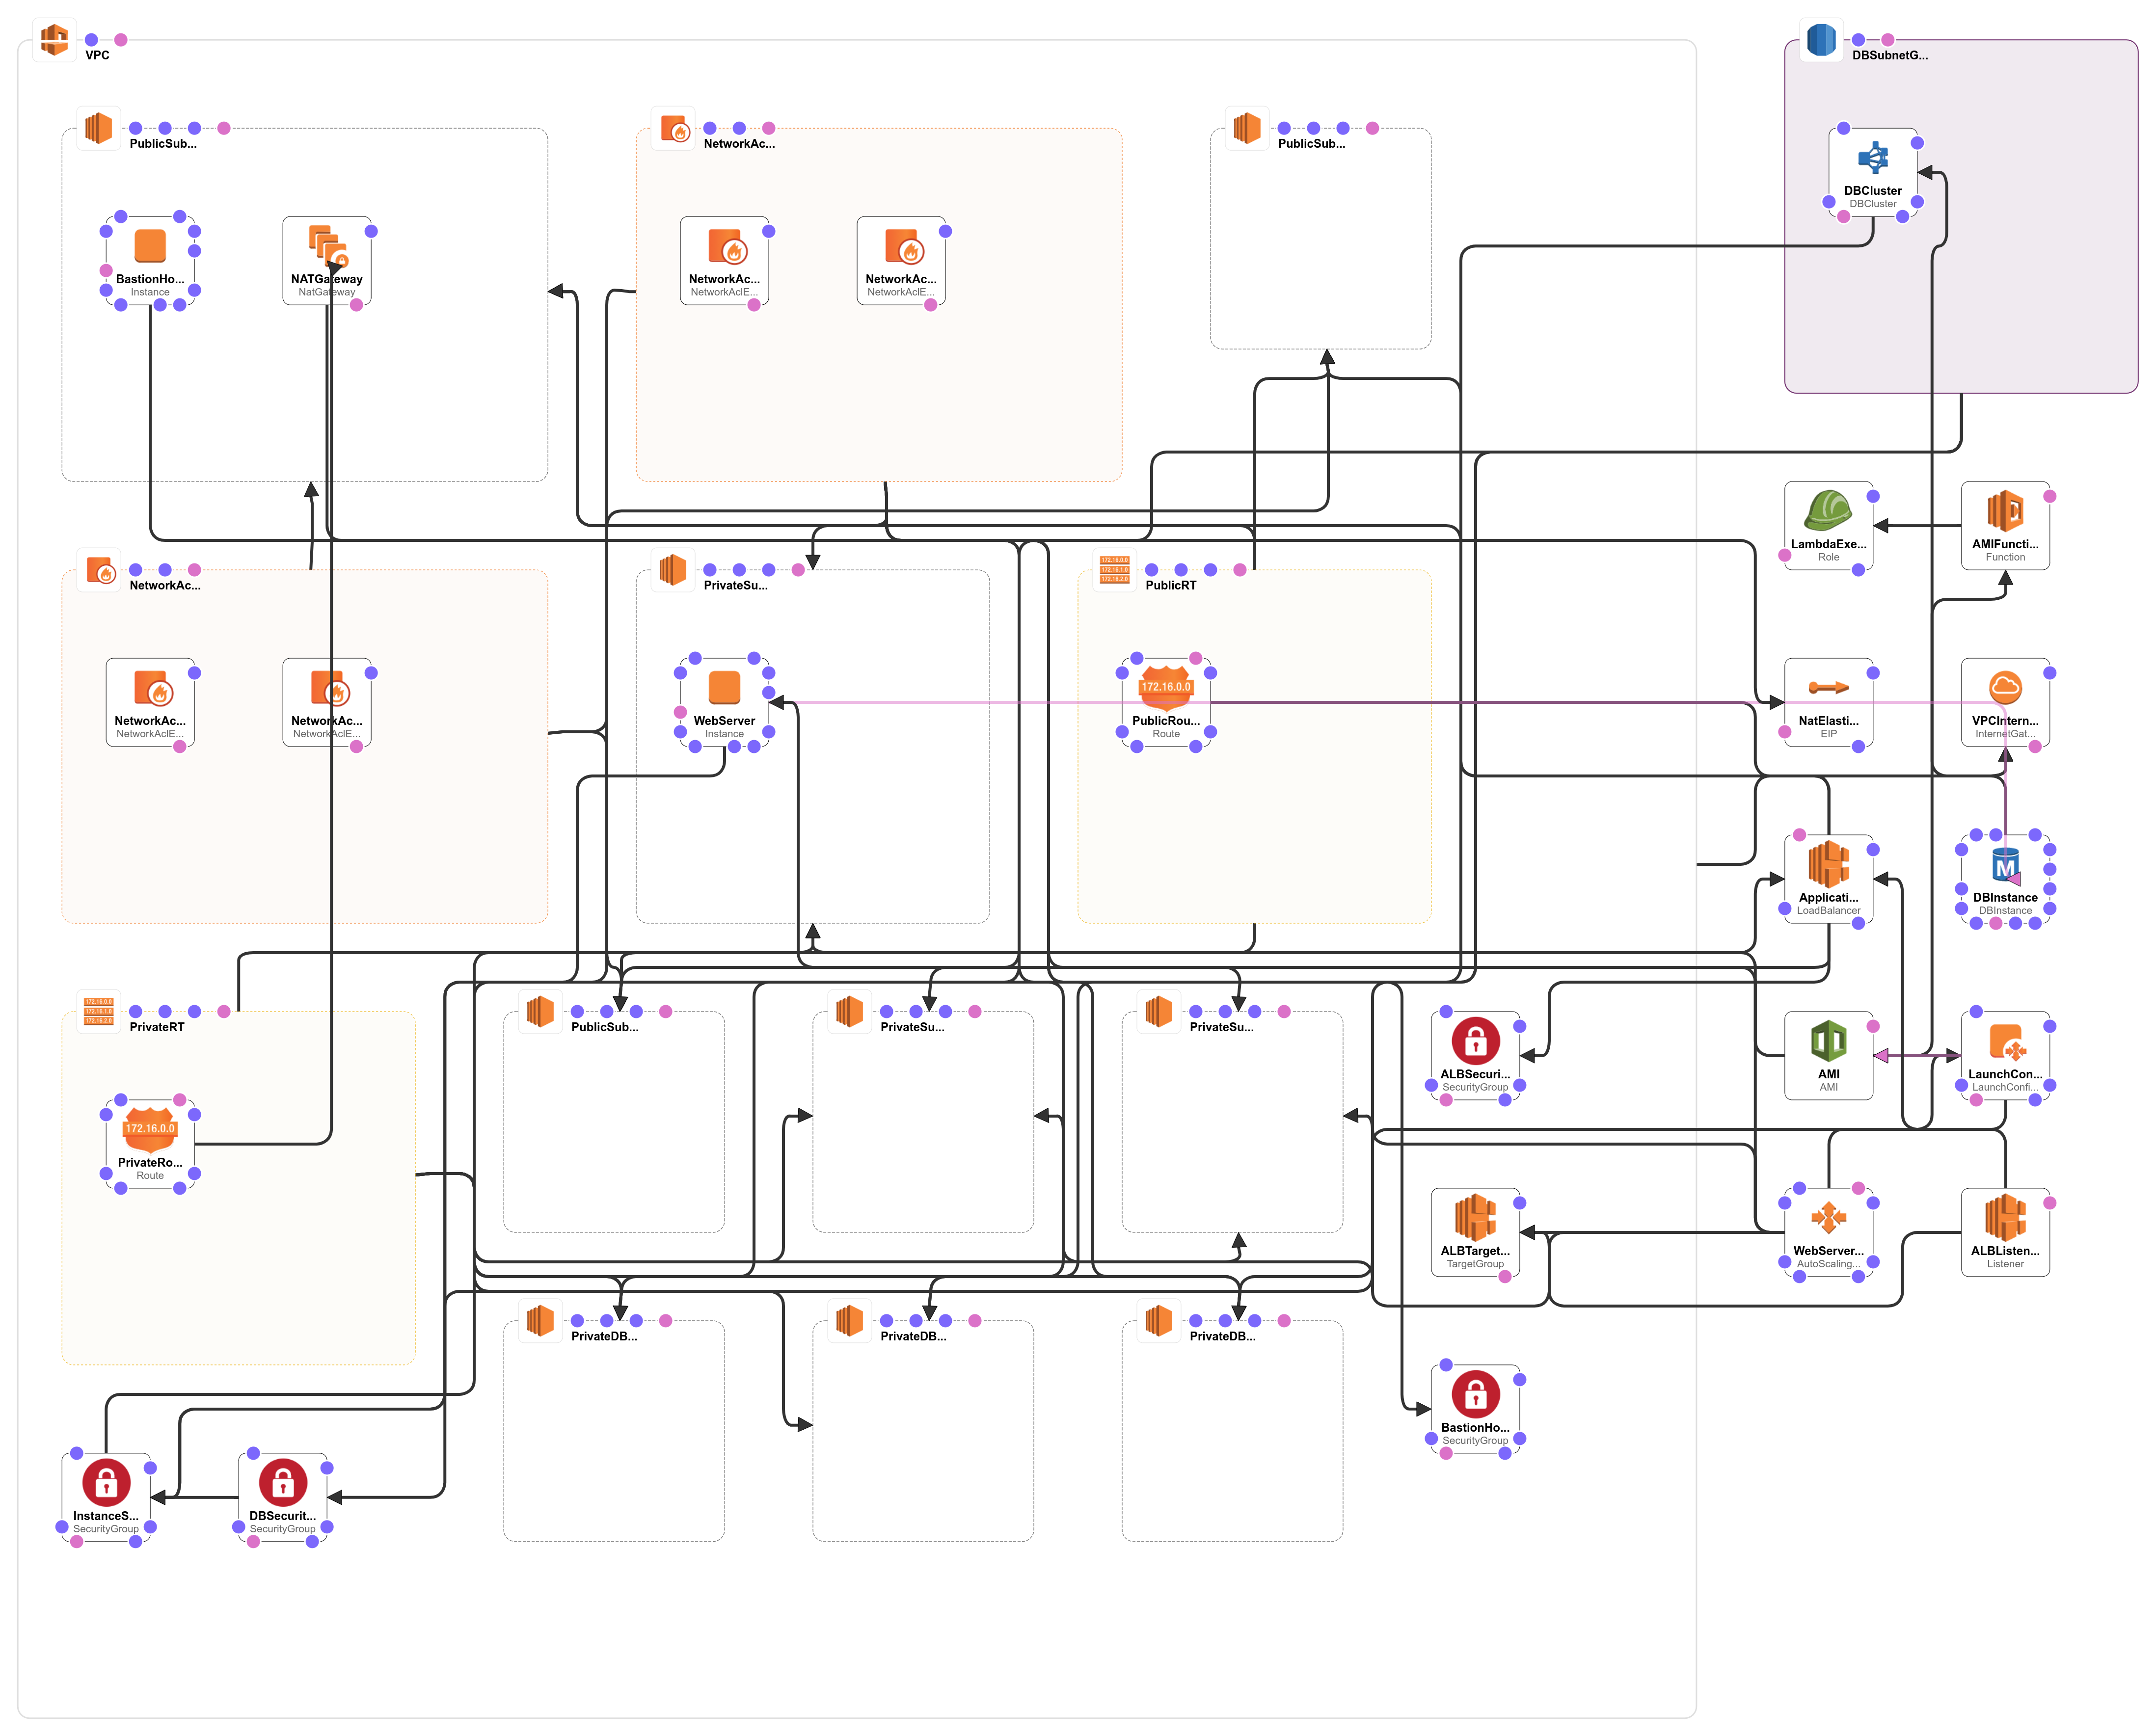
The template above is used to create resources in the style of a bastion host jump box. The template includes the following resources:
- Creates a custom VPC including: 3 public subnets, 3 app private subnets, and 3 db private subnets located in 3 different availability zones.
- App instance group resides in the app private subnets, allowing only SSH traffic from the bastion host and HTTP traffic from the Load Balancer to enter.
- The RDS database is placed in the db private subnet, allowing only SQL traffic to enter from a specified security group.
Parameters for the template
Parameters:
  AMIName:
    Type: String
    Description: Name for AMI creation
    ConstraintDescription: Name for image
    MinLength: '6'
    MaxLength: '64'
  DBName:
    Default: MyDatabase
    Description: MySQL database name
    Type: String
    MinLength: '1'
    MaxLength: '64'
  DBUser:
    NoEcho: 'true'
    Description: Username for MySQL database access
    Type: String
    MinLength: '1'
    MaxLength: '64'
    AllowedPattern: '[a-zA-Z][a-zA-Z0-9]*'
    ConstraintDescription: must begin with a letter and contain only alphanumeric characters
  DBRootPassword:
    NoEcho: 'true'
    Description: Password for mysql access
    Type: String
    MinLength: '8'
    MaxLength: '41'
    AllowedPattern: '[a-zA-Z0-9]*'
    ConstraintDescription: must contain only alphanumeric characters
  InstanceType:
    Description: WebServer EC2 instance type
    Type: String
    Default: t2.small
    AllowedValues:
      - t1.micro
      - t2.nano
      - t2.micro
      - t2.small
      - t2.medium
      ...
    ConstraintDescription: must be a valid EC2 instance type.
  KeyName:
    Description: Name of an existing EC2 KeyPair to enable SSH access to the instances
    Type: 'AWS::EC2::KeyPair::KeyName'
    ConstraintDescription: must be the name of an existing EC2 KeyPair.
  SSHLocation:
    Description: The IP address range that can be used to SSH to the EC2 instances
    Type: String
    MinLength: '9'
    MaxLength: '18'
    Default: 0.0.0.0/0
    AllowedPattern: '(\d{1,3})\.(\d{1,3})\.(\d{1,3})\.(\d{1,3})/(\d{1,2})'
    ConstraintDescription: must be a valid IP CIDR range of the form x.x.x.x/x.
The parameters used in the template include:
AMIName: Used to name the image when creating an AMI for updating the Launch Configuration.DBUser,DBName,DBRootPassword: Used to create the RDS database.KeyName: Specifies the key when using SSH to create an EC2 instance.SSHLocation: Specifies the source IP allowed to SSH into the instance.
The structure of a parameter is as follows, with the properties used for the parameters mentioned above:
- Parameter Name
- Description: Description of the parameter.
- Type: Type of the parameter. CloudFormation supports various types such as String, Number, List
, and also allows listing other AWS resources like AWS::EC2::KeyPair::KeyName (keypair), ListAWS::EC2::VPC::Id (list of VPCs), ListAWS::EC2::SecurityGroup::Id (list of security groups), etc. - Min, MaxLength: Limits on the number of characters for the parameter.
- Default: Default value of the parameter.
- AllowedPattern: Allows specifying a pattern, like a regex, to ensure that the parameter’s data conforms to that pattern.
- NoEcho: Similar to a password field in an HTML form, setting it to true means the value of the field will not be displayed in the UI but will be hidden.
Maping
Mappings:
  AWSInstanceType2Arch:
    t1.micro:
      Arch: HVM64
    t2.nano:
      Arch: HVM64
    ...
  AWSInstanceType2NATArch:
    t1.micro:
      Arch: NATHVM64
    t2.nano:
      Arch: NATHVM64
    ...
  AWSRegionArch2AMI:
    us-east-1:
      HVM64: ami-0080e4c5bc078760e
      HVMG2: ami-0aeb704d503081ea6
    ...
The mapping section is used to declare a mapping of instance types to their respective architectures and corresponding AMIs in each region. It is specifically used when creating instances within the template.
Resources
1.VPC
To create a VPC, you only need to define a VPC resource, where the Typ is set to AWS::EC2::VPC. All resources must have a Type declared, which allows CloudFormation to identify the corresponding AWS resource to create. When creating resources in the AWS Management Console, you need to fill in the corresponding parameters for that resource. Similarly, when working with CloudFormation, you specify these parameters in the Properties section. Each type of resource will have different properties.
To look up information about a specific resource, you can simply Google the resource name followed by ‘cloudformation’, which will lead you to the documentation page for that resource. For example, in this case, you can search for the VPC CloudFormation documentation
VPC CloudFormation
Here are all the corresponding properties to declare a VPC resource in CloudFormation:
Type: AWS::EC2::VPC
Properties:
  CidrBlock: String
  EnableDnsHostnames: Boolean
  EnableDnsSupport: Boolean
  InstanceTenancy: String
  Tags:
    - Tag
Indeed, not all properties in the Properties section are mandatory. In the case of creating a simple VPC with just the CidrBlock set to 10.0.0.0/16, it would look like this:
Resources:
  VPC:
    Type: 'AWS::EC2::VPC'
    Properties:
      CidrBlock: 10.0.0.0/16
2. Subnet
To create a public subnet, you can do it similarly to the VPC. Here’s an example:
PublicSubnetA:
  Type: 'AWS::EC2::Subnet'
  Properties:
    VpcId: !Ref VPC
    CidrBlock: 10.0.0.0/24
    AvailabilityZone: us-east-1a
    MapPublicIpOnLaunch: true
Here, intrinsic function Ref is used, and here’s how to use it:
// yml
!Ref resource
// JSON
{ "Ref": resource },
Ref can be used with parameters or logical resources declared in CloudFormation. When used with a parameter, it returns the value of the parameter, whereas when used with a resource, it returns the value of the resource, typically the physical ID.
Above is a sample of a subnet, and the remaining subnets are created similarly, with only the corresponding Properties changed, just like when creating them manually through the AWS Management Console.
3. Internet Gateway
The default VPC comes with an attached Internet Gateway. In this case, when creating a custom VPC, you need to create an Internet Gateway and attach it to the newly created VPC using CloudFormation as follows:
VPCInternetGateway:
  Type: 'AWS::EC2::InternetGateway'
VpcGatewayAttachment:
  Type: 'AWS::EC2::VPCGatewayAttachment'
  Properties:
    InternetGatewayId: !Ref VPCInternetGateway
    VpcId: !Ref VPC
4. Route Table
To facilitate management, we don’t consolidate all the rules into one route; instead, we divide them into corresponding route tables. In CloudFormation, you can achieve this by:
1.Creating a route table:
The template snippet below is used to create a route table for the public subnets.
  PublicRT:
    Type: 'AWS::EC2::RouteTable'
    Properties:
      VpcId: !Ref VPC
2.Creating a route:
In the route table, there will be rules that map which destination networks go where. In this case, it’s a public route, so we will map all requests to the Internet Gateway
  PublicRoute:
    Type: 'AWS::EC2::Route'
    Properties:
      RouteTableId: !Ref PublicRT
      DestinationCidrBlock: 0.0.0.0/0
      GatewayId: !Ref VPCInternetGateway
3.Associating the route table with the subnet:
  PublicARouteAssociation:
    Type: 'AWS::EC2::SubnetRouteTableAssociation'
    Properties:
      RouteTableId: !Ref PublicRT
      SubnetId: !Ref PublicSubnetA
5. NACL (Network Access Control List)
This part will include:
1.Creating a NACL:
  NetworkAclPublic:
    Type: 'AWS::EC2::NetworkAcl'
    Properties:
      VpcId: !Ref VPC
2.Associating subnets with ACL
You need to create as many associations as the number of subnets you want to associate
  SubnetNetworkAclAssociationPublicA:
    Type: 'AWS::EC2::SubnetNetworkAclAssociation'
    Properties:
      NetworkAclId: !Ref NetworkAclPublic
      SubnetId: !Ref PublicSubnetA
3.Creating allow or deny rules for incoming traffic
In this case, it’s a public subnet, so we will allow all traffic
  NetworkAclEntryPublicInAllowAll:
    Type: 'AWS::EC2::NetworkAclEntry'
    Properties:
      NetworkAclId: !Ref NetworkAclPublic
      RuleNumber: 99
      Protocol: -1
      RuleAction: allow
      Egress: false
      CidrBlock: 0.0.0.0/0
  NetworkAclEntryPublicOutAllowAll:
    Type: 'AWS::EC2::NetworkAclEntry'
    Properties:
      NetworkAclId: !Ref NetworkAclPublic
      RuleNumber: 99
      Protocol: -1
      RuleAction: allow
      Egress: true
      CidrBlock: 0.0.0.0/0
6. Creating an RDS cluster and RDS instance
1.Creating a subnet group
Before creating an RDS instance, it’s necessary to create a subnet group to ensure that the RDS instance is placed in the desired subnets. In this case, the RDS instance will reside in the private DB subnets
  DBSubnetGroup:
    Type: 'AWS::RDS::DBSubnetGroup'
    Properties:
      DBSubnetGroupName: rdssubnet
      DBSubnetGroupDescription: Private group subnet for db
      SubnetIds:
        - !Ref PrivateDBSubnetA
        - !Ref PrivateDBSubnetB
        - !Ref PrivateDBSubnetC
2. Creating a security group
Creating a security group that allows incoming traffic only from the instance’s security group
  DBSecurityGroup:
    Type: 'AWS::EC2::SecurityGroup'
    Properties:
      GroupDescription: Enable access to SQL connect
      VpcId: !Ref VPC
      SecurityGroupIngress:
        - IpProtocol: tcp
          FromPort: '3306'
          ToPort: '3306'
          SourceSecurityGroupId: !GetAtt
            - InstanceSecurityGroup
            - GroupId
Here, the intrinsic function GetAtt is used to retrieve attributes of a logical resource within the template. The syntax is as follows
// YAML
!GetAtt
  - Logical resource name
  - Attribute
// JSON
{"Fn::GetAtt": ["Logical resource name", "Attribute"] }
The attributes that are supported for retrieval depend on the type of resource. In cases where there is no corresponding attribute, you may encounter an error when creating a stack from the template.
3.Creating an RDS cluster
  DBCluster:
    Type: 'AWS::RDS::DBCluster'
    Properties:
      Engine: aurora-mysql
      EngineVersion: 5.7.mysql_aurora.2.04.7
      MasterUsername: !Ref DBUser
      MasterUserPassword: !Ref DBRootPassword
      DBSubnetGroupName: !Ref DBSubnetGroup
      VpcSecurityGroupIds:
        - !GetAtt
          - DBSecurityGroup
          - GroupId
The username and password information is retrieved from parameters, while the subnet and security group information is obtained from the resources created earlier
4. Creating an RDS instance
  DBInstance:
    Type: 'AWS::RDS::DBInstance'
    Properties:
      DBClusterIdentifier: !Ref DBCluster
      DBInstanceClass: db.t2.medium
      Engine: aurora-mysql
If you were creating this on the AWS Management Console, you would typically need to create an instance when creating a cluster. However, CloudFormation allows you to create the cluster first and then create the instance. The DBInstanceClass parameter is often specified using a parameter, but for simplicity, it can be fixed during creation
7. Create web server instance
The idea is to create a server, install Ruby on it, generate a simple app, and then create an AMI from this server. This AMI will be used to create an auto-scaling group. Afterward, the instance will be stopped. The entire setup is done using cloud-init. To provide detailed information about this process would be lengthy, so I will skip it and provide a link to the template below.
8. Create a AMI
Not all resources are supported by AWS directly, and in such cases, CloudFormation doesn’t natively support creating an AMI. This is where custom resources come into play. These resources are declared with a Type of Custom::"Custom Resource Name". To create an AMI, you would need to create a custom resource and then use a Lambda function to create the AMI
1.Creating a custom resource for an AMI:
  AMI:
    Type: 'Custom::AMI'
    Properties:
      ServiceToken: !GetAtt
        - AMIFunction
        - Arn
      InstanceId: !Ref WebServer
      ImageName: !Ref AMIName
ServiceToken is the only mandatory property in the Properties section. It represents the destination where CloudFormation sends the request. Below that, InstanceId and ImageName will be sent as part of the request.
2.Creating a role for Lambda
Create a role with the necessary policies to create a Lambda function
  LambdaExecutionRole:
    Type: 'AWS::IAM::Role'
    Properties:
      AssumeRolePolicyDocument:
        Version: 2012-10-17
        Statement:
          Effect: Allow
          Principal:
            Service:
              - lambda.amazonaws.com
          Action:
            - 'sts:AssumeRole'
      Path: /
      ManagedPolicyArns:
        - 'arn:aws:iam::aws:policy/service-role/AWSLambdaBasicExecutionRole'
        - 'arn:aws:iam::aws:policy/service-role/AWSLambdaRole'
      Policies:
        - PolicyName: EC2Policy
          PolicyDocument:
            Version: 2012-10-17
            Statement:
              - Effect: Allow
                Action:
                  - 'ec2:DescribeInstances'
                  - 'ec2:DescribeImages'
                  - 'ec2:CreateImage'
                  - 'ec2:StopInstances'
                Resource:
                  - '*'
3. Create Lambda Function
  AMIFunction:
    Type: 'AWS::Lambda::Function'
    Properties:
      Handler: index.handler
      Role: !GetAtt
        - LambdaExecutionRole
        - Arn
      Code:
        ZipFile: !Join
          - ... function code
      Runtime: python3.8
      Timeout: '900'
Above, the Lambda function is created with the functionality to extract the instance ID from the request called to the custom resource. It then creates an AMI from that instance. Once the creation is complete, it sends back the AMI ID to the custom resource. This is achieved through cfn-response, and libraries for this can vary depending on the programming language used
# require sdk and cfn-response lib
import cfnresponse
import boto3

def handler(event, context):
  # Get information about instance
  ec2 = boto3.resource('ec2')
  instance_id = event['ResourceProperties']['InstanceId']
  image_name = event['ResourceProperties']['ImageName']
  instance = ec2.Instance(instance_id)

  # create image
  image = instance.create_image(Name=image_name)

  # resolved_image is write bellow but not showing here, it's wait until image creation complete and  send signal back to CloudFormation by using cfn-response:
  # cfnresponse.send(event, context, cfnresponse.SUCCESS, {'image_id': image.id}, image.id)
  # Usage of cfn-response: cfnresponse.send(event, context, status, data, physicalID)
  # CloudFormation will wait until get signal or timeout
  resolved_image(image, event, context)
  instance.stop()
9. Create Launch Configuration
  LaunchConfig:
    Type: 'AWS::AutoScaling::LaunchConfiguration'
    DependsOn: AMI
    Properties:
      ImageId: !GetAtt
        - AMI
        - image_id
      KeyName: !Ref KeyName
      SecurityGroups:
        - !Ref InstanceSecurityGroup
      InstanceType: !Ref InstanceType
      UserData: !Base64
        'Fn::Join':
          - ''
          - - |
              #!/bin/bash -xe
            - |
              yum update -y aws-cfn-bootstrap
            - '/opt/aws/bin/cfn-signal -e 0 --stack '
            - !Ref 'AWS::StackName'
            - ' --resource WebServerGroup '
            - ' --region '
            - !Ref 'AWS::Region'
Once the AMI is created, the Launch Configuration is then created. In the UserData section, cfn-signal is used to send a signal when the resource is created for the WebServerGroup, which will be discussed below
10. Creating an ALB (Application Load Balancer), Listener, and Target Group
  ApplicationLoadBalancer:
    Type: 'AWS::ElasticLoadBalancingV2::LoadBalancer'
    Properties:
      Subnets:
        - !Ref PublicSubnetA
        - !Ref PublicSubnetB
        - !Ref PublicSubnetC
      SecurityGroups:
        - !Ref ALBSecurityGroup
  ALBListener:
    Type: 'AWS::ElasticLoadBalancingV2::Listener'
    Properties:
      DefaultActions:
        - Type: forward
          TargetGroupArn: !Ref ALBTargetGroup
      LoadBalancerArn: !Ref ApplicationLoadBalancer
      Port: '80'
      Protocol: HTTP
  ALBTargetGroup:
    Type: 'AWS::ElasticLoadBalancingV2::TargetGroup'
    Properties:
      HealthCheckIntervalSeconds: 30
      HealthCheckTimeoutSeconds: 5
      HealthyThresholdCount: 3
      Port: 80
      Protocol: HTTP
      UnhealthyThresholdCount: 5
      VpcId: !Ref VPC
The snippet above creates an ALB, a Listener, and forwards HTTP traffic from the ALB to the Target Group, similar to when creating it through the AWS Management Console
11.Create autoscaling
  WebServerGroup:
    Type: 'AWS::AutoScaling::AutoScalingGroup'
    Properties:
      VPCZoneIdentifier:
        - !Ref PrivateSubnetA
        - !Ref PrivateSubnetB
        - !Ref PrivateSubnetC
      LaunchConfigurationName: !Ref LaunchConfig
      MinSize: '2'
      MaxSize: '2'
      TargetGroupARNs:
        - !Ref ALBTargetGroup
      HealthCheckType: ELB
      HealthCheckGracePeriod: '300'
    CreationPolicy:
      ResourceSignal:
        Timeout: PT15M
    UpdatePolicy:
      AutoScalingRollingUpdate:
        MinInstancesInService: '1'
        MaxBatchSize: '1'
        PauseTime: PT15M
The AutoScaling Group is created using the Launch Configuration created earlier. The Launch Configuration includes the use of cfn-signal in user data because in the WebServerGroup, we use a CreationPolicy. This means that we want CloudFormation to wait until all the EC2 instances are successfully up and running before changing the resource’s status. The AutoScaling Group uses a Rolling Update Policy, which means that it replaces each instance in the group one at a time during updates
Here is the full template for reference
Leave a comment